Table of contents
デスクトップを自分好みにカスタマイズ
Xを見ていると,Macのデスクトップ上でおしゃれに時刻を表示している方を時折見かけます。「自分もこんな風にデスクトップをカスタマイズしてみたい!」と思い、同様のことができるツールを探していたところ、たどり着いたのが「Übersicht」というアプリです。
今回は,このÜbersichtの基本的な使い方と,私が実際に作成して愛用している「シンプルな時計ウィジェット」と「Spotifyの再生情報付き時計ウィジェット」のコードをご紹介します。
Übersichtとは?
Übersichtは,システムコマンドを実行し,その出力をデスクトップ上の「ウィジェット」と呼ばれる小さなコンテナに表示できるMac用アプリケーションです。
特筆すべきは,ウィジェットがHTML5やReactのJSXを使って書かれている点です。そのため,Webフロントエンドの知識が多少あれば,データの表示形式からデザイン,レスポンシブ対応まで,非常に簡単に作成・カスタマイズすることができます。
インストール方法と基本的な使い方
- Übersichtの公式サイトからアプリをダウンロードします。
- ダウンロードしたアプリを「アプリケーション」フォルダに移動して起動します。
- メニューバーにÜbersichtのアイコン(Uの字のアイコン)が表示されるので,「Open Widgets Folder」をクリックします。
- 開いたフォルダの中に,これから紹介する
.jsx拡張子のファイルを配置するだけで,デスクトップにウィジェットが自動的に表示されます。(メニューバーからどのディスプレイに表示するかなど詳しく設定できます。)
実際に使っているウィジェットの紹介
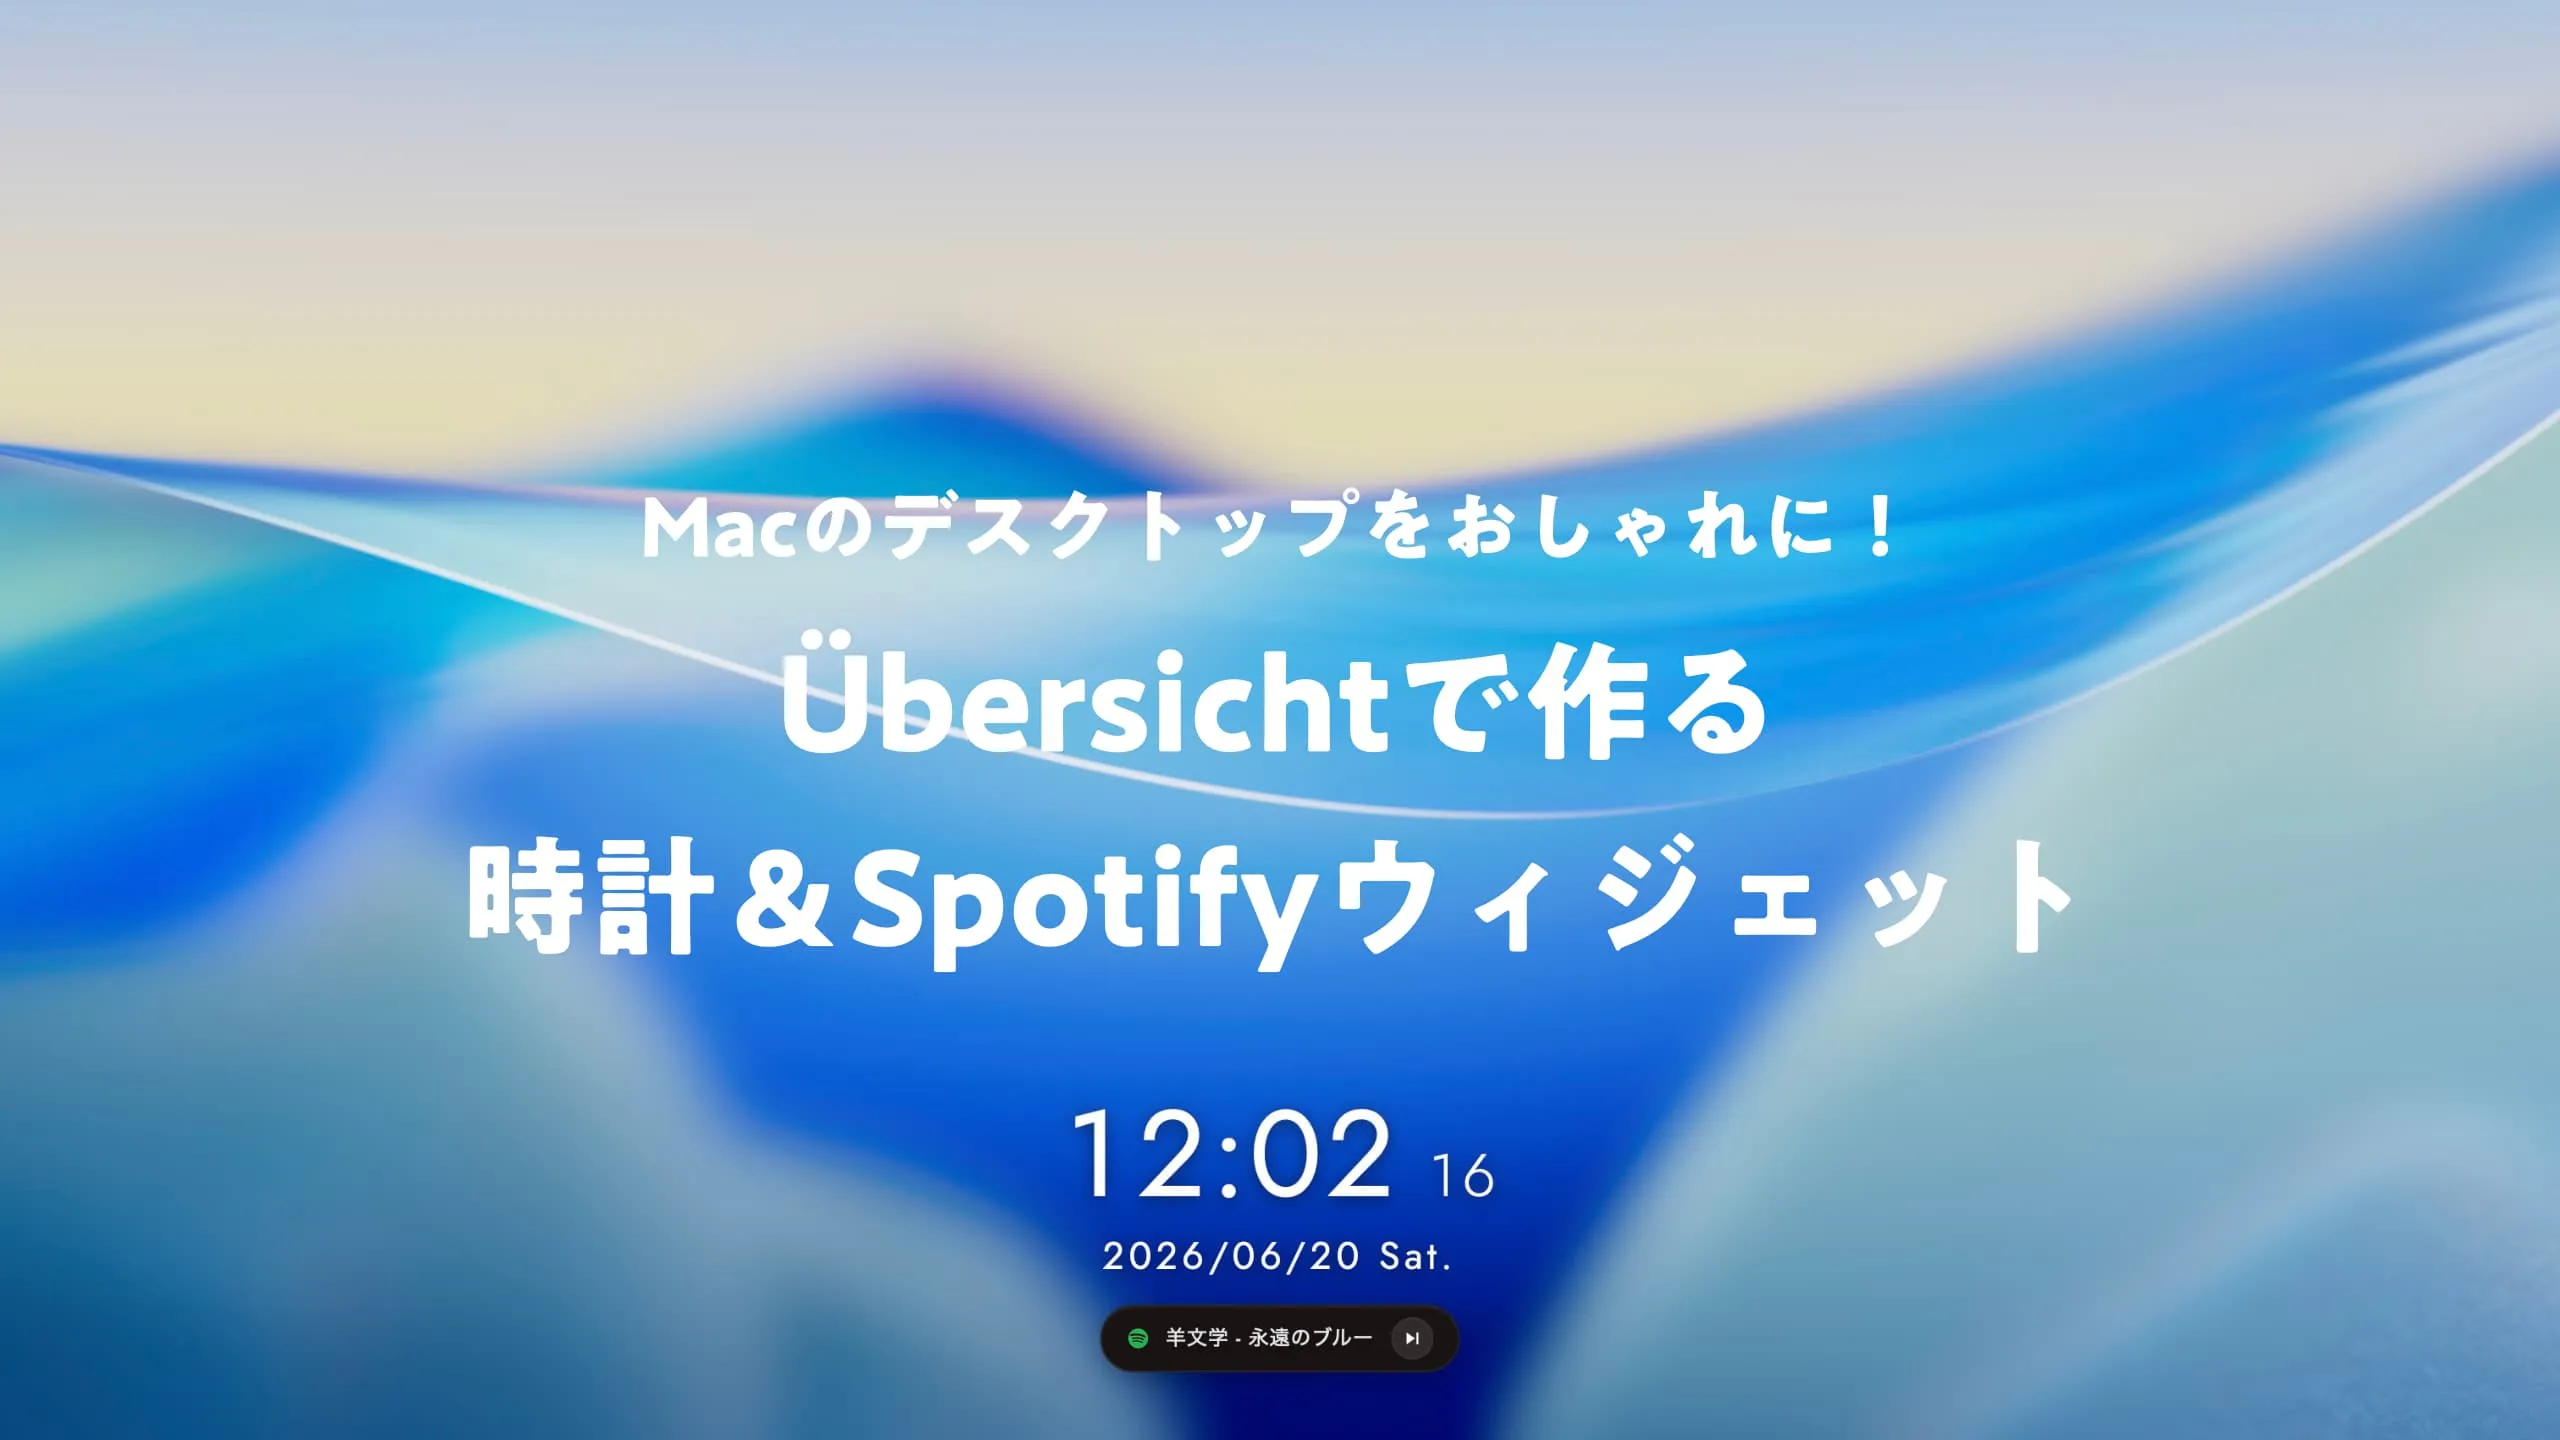
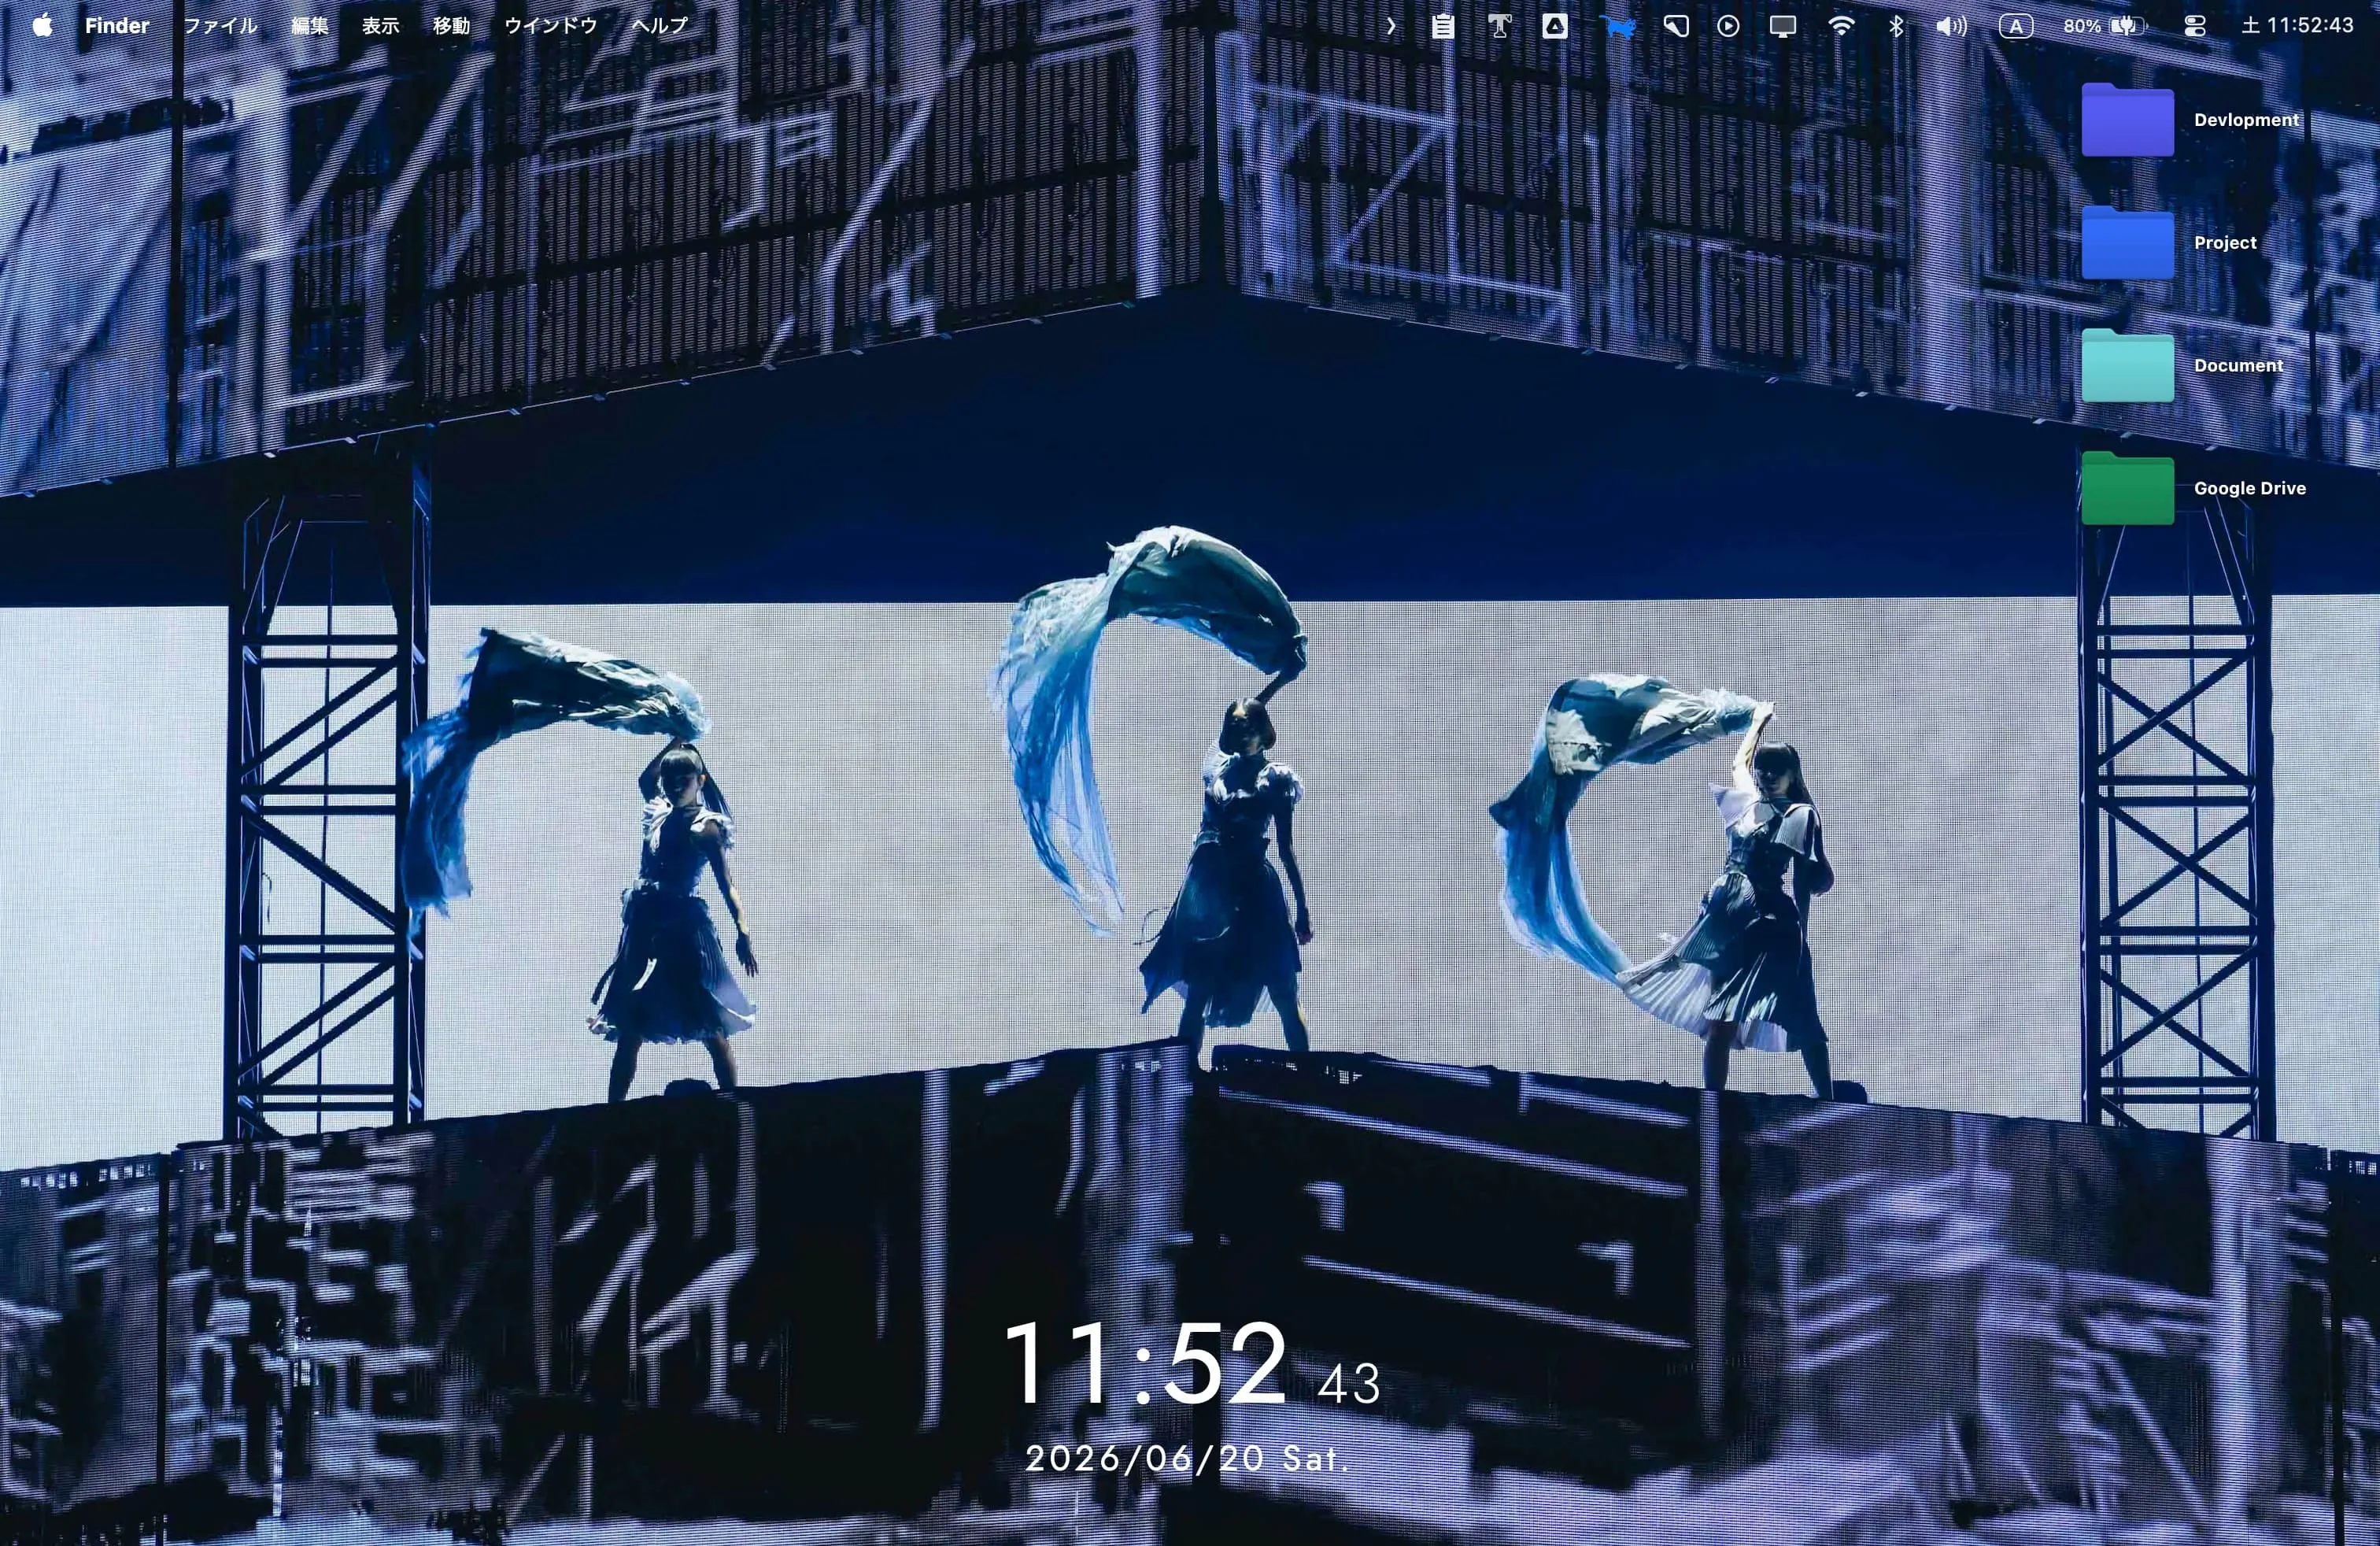
ここからは,私が実際に使用している2つのウィジェットのコードを,デスクトップイメージ1と共に紹介します。お好みに合わせてウィジェットフォルダ(拡張子は .jsx)に保存して使ってみてください。
1. シンプルな時計ウィジェット
まずは,日付と時間をシンプルに表示するウィジェットです。画面の中央下部に配置されるようにCSSを調整しています。
import { run } from "uebersicht";

export const command = async (dispatch) => {
  const dateOutput = await run("date +'%Y/%m/%d %a. %H:%M %S'");

  dispatch({
    type: "UPDATE",
    data: {
      dateOutput,
    },
  });
};

export const refreshFrequency = 1000;

export const className = `
  bottom: 40px;
  left: 50%;
  transform: translateX(-50%);
  font-family: 'Jost*','DIN Alternate','Futura', sans-serif;
  color: #ffffff;
  text-align: center;
  text-shadow: 0px 2px 10px rgba(0, 0, 0, 0.5);

  .time {
    font-size: 4.5rem;
    font-variant-numeric: tabular-nums;
    -webkit-font-feature-settings: "tnum" 1;
    -moz-font-feature-settings: "tnum" 1;
    font-feature-settings: "tnum" 1;
    font-weight: 400;
    line-height: 1;
    display: flex;
    align-items: baseline;
    justify-content: center;
    margin: 0;
  }

  .seconds {
    font-variant-numeric: tabular-nums;
    -webkit-font-feature-settings: "tnum" 1;
    -moz-font-feature-settings: "tnum" 1;
    font-feature-settings: "tnum" 1;
    font-size: 2.2rem;
    font-weight: 300;
    margin-left: 1rem;
    letter-spacing: 0.05em;
  }

  .date {
    font-variant-numeric: tabular-nums;
    -webkit-font-feature-settings: "tnum" 1;
    -moz-font-feature-settings: "tnum" 1;
    font-feature-settings: "tnum" 1;
    font-size: 1.4rem;
    font-weight: 400;
    margin-top: 0.5rem;
    letter-spacing: 0.12em;
  }

`;

export const updateState = (event, previousState) => {
  if (event.type === "UPDATE") return { ...previousState, ...event.data };
  return previousState;
};

export const render = ({ dateOutput }) => {
  if (!dateOutput) return null;

  const parts = dateOutput.trim().split(" ");
  if (parts.length !== 4) return null;

  const [date, day, time, seconds] = parts;

  return (
    <div>
      <div className="time">
        {time}
        <span className="seconds">{seconds}</span>
      </div>
      <div className="date">{date} {day}</div>
    </div>
  );
};clock.jsx
2. 時計 + Spotifyウィジェット
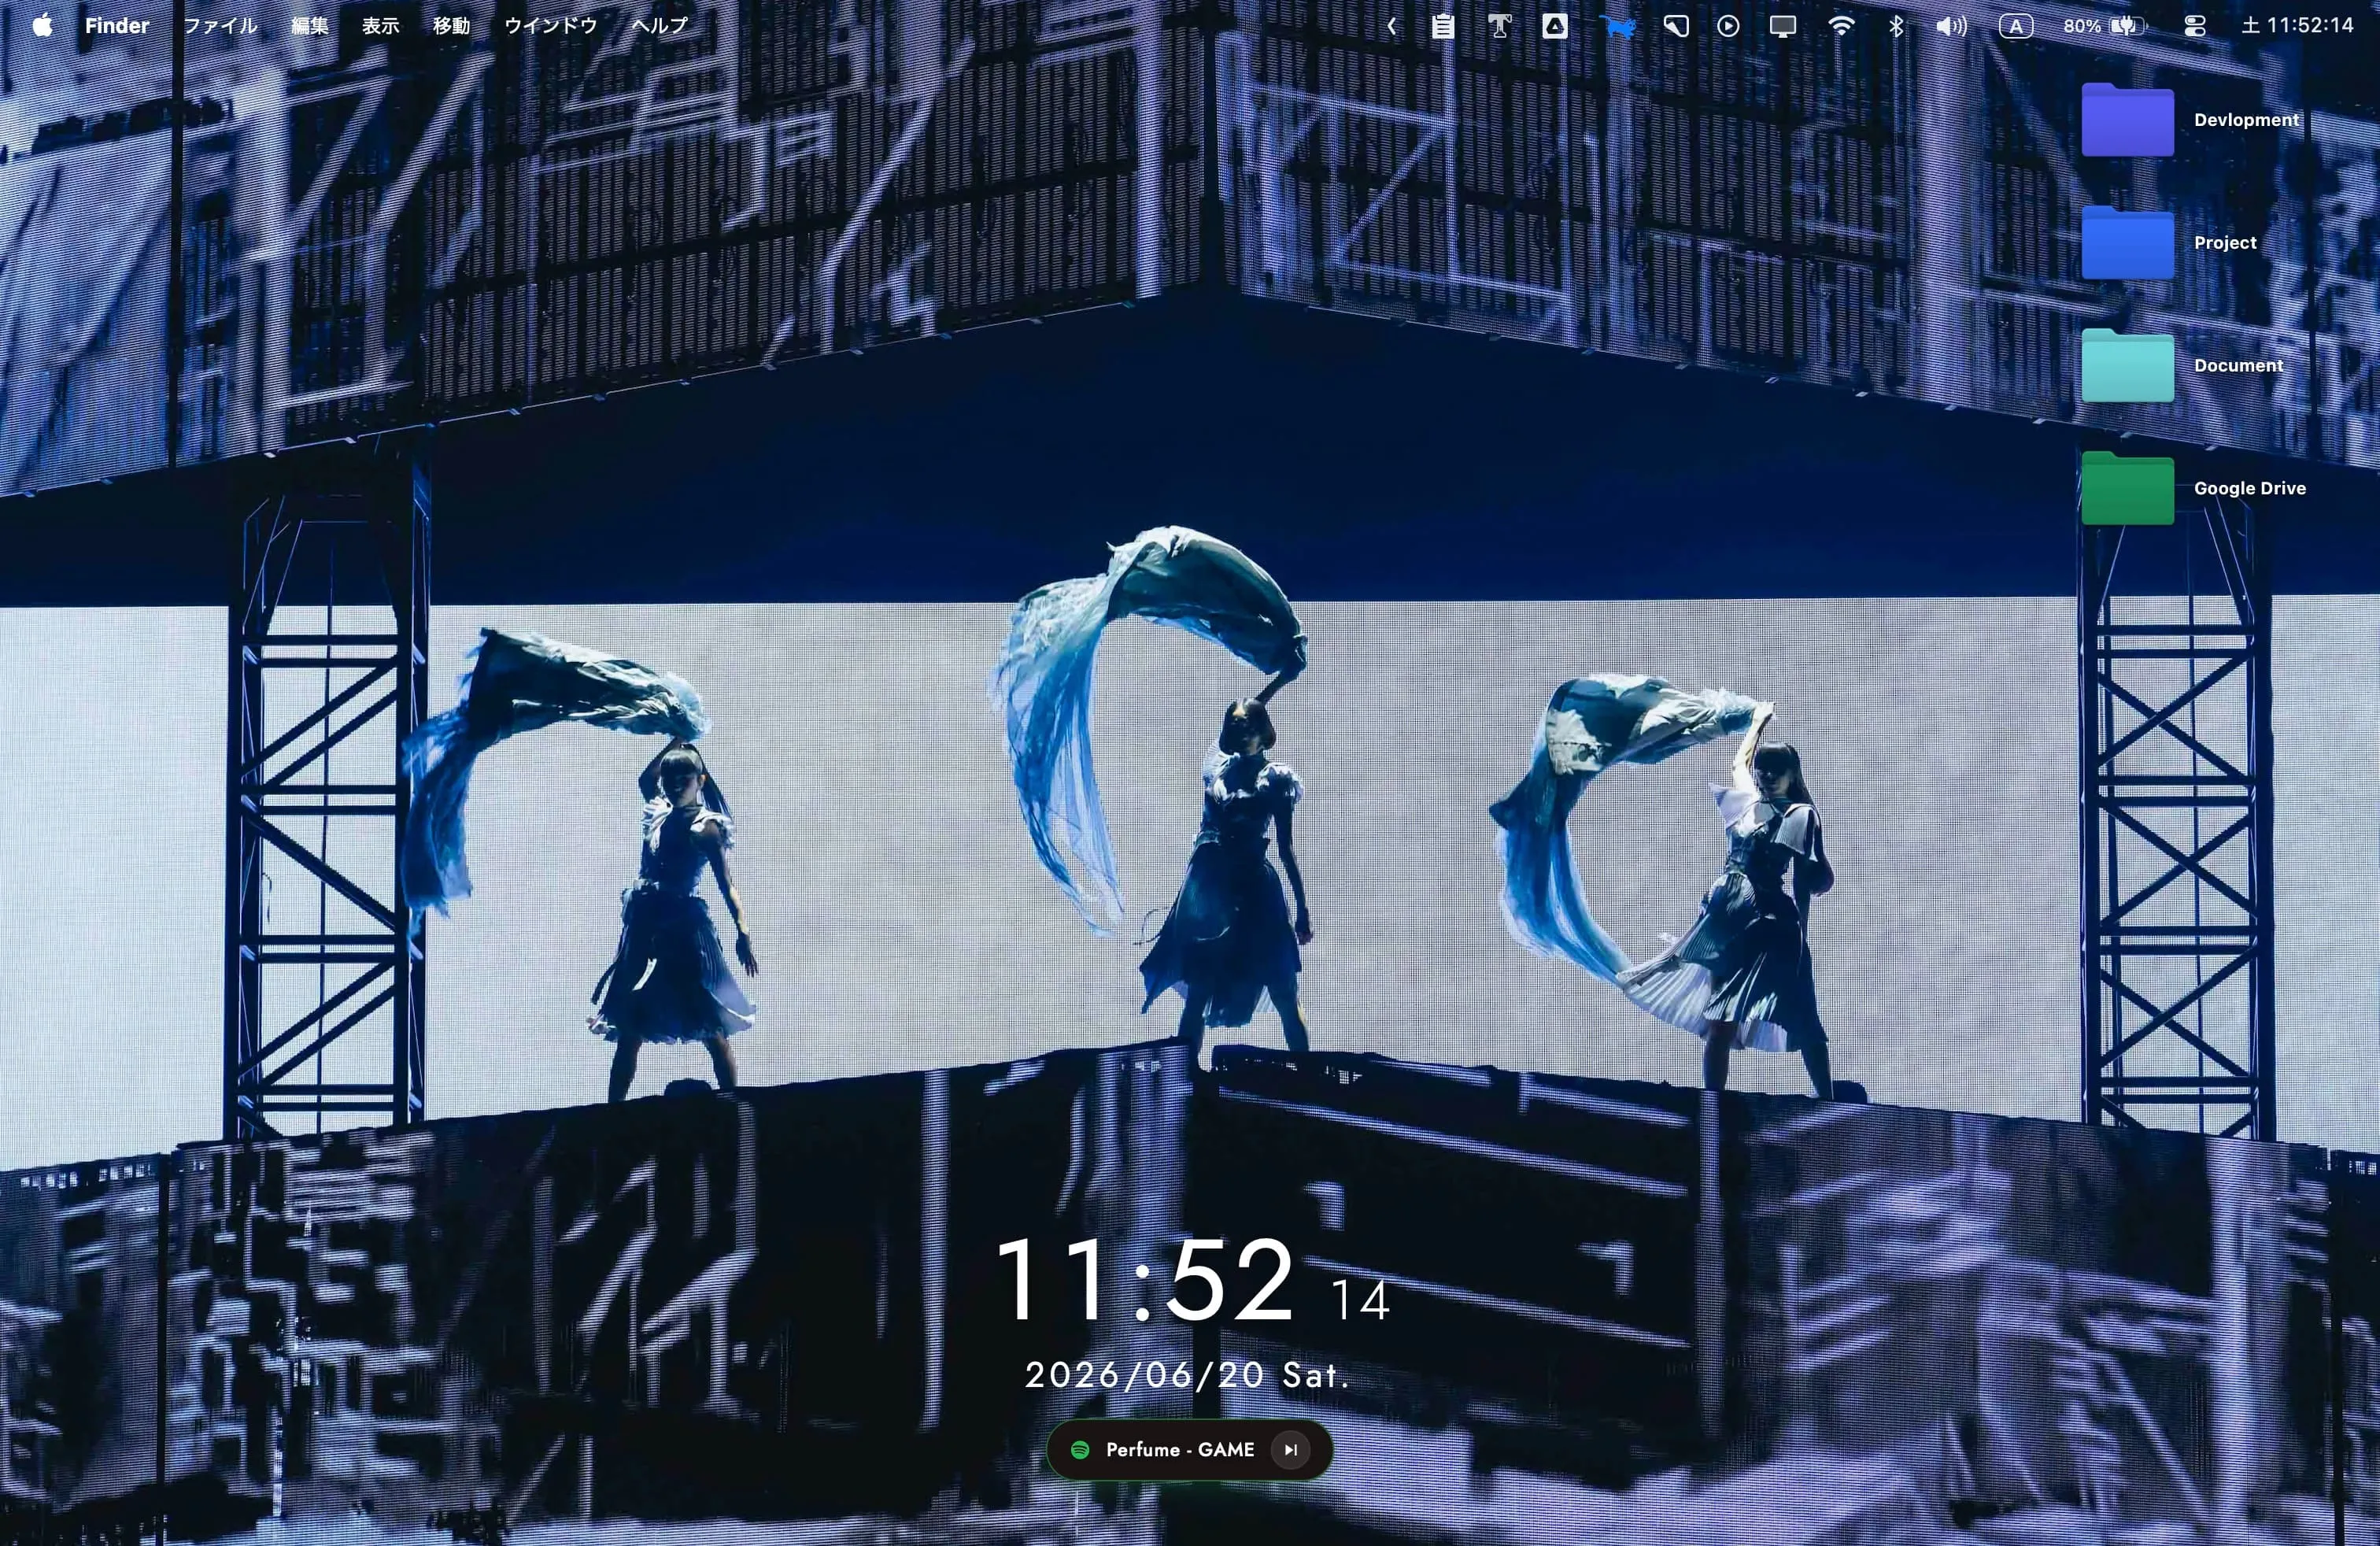
続いては,上記の時計の下に,現在Spotifyで再生している曲名とアーティスト名を表示するウィジェットです。システム上でSpotifyが起動しているかを確認し,再生中の曲情報を取得しています。 曲のスキップボタンや,クリックしてSpotifyをアクティブにする機能も搭載しています。
import { run } from "uebersicht";

export const command = async (dispatch) => {
  const dateOutput = await run("date +'%Y/%m/%d %a. %H:%M %S'");

  let track = "Spotifyを開く";

  try {
    const isRunning = await run(
      'osascript -e \'tell application "System Events" to (name of processes) contains "Spotify"\'',
    );
    if (isRunning.trim() === "true") {
      const currentTrack = await run(
        'osascript -e \'tell application "Spotify" to artist of current track & " - " & name of current track\'',
      );
      track = currentTrack.trim() || track;
    }
  } catch (error) {
    track = "Spotifyを開く";
  }

  dispatch({
    type: "UPDATE",
    data: {
      dateOutput,
      track,
    },
  });
};

export const refreshFrequency = 1000;

export const className = `
  bottom: 40px;
  left: 50%;
  transform: translateX(-50%);
  font-family: 'Jost*','DIN Alternate','Futura';
  color: #ffffff;
  text-align: center;
  text-shadow: 0px 2px 10px rgba(0, 0, 0, 0.5);

  .time {
    font-size: 4.5rem;
    font-variant-numeric: tabular-nums;
    -webkit-font-feature-settings: "tnum" 1;
    -moz-font-feature-settings: "tnum" 1;
    font-feature-settings: "tnum" 1;
    font-weight: 400;
    line-height: 1;
    display: flex;
    align-items: baseline;
    justify-content: center;
    margin: 0;
    letter-spacing: 0.03em;
  }

  .seconds {
    font-variant-numeric: tabular-nums;
    -webkit-font-feature-settings: "tnum" 1;
    -moz-font-feature-settings: "tnum" 1;
    font-feature-settings: "tnum" 1;
    font-size: 2.2rem;
    font-weight: 300;
    margin-left: 1rem;
    letter-spacing: 0.03em;
  }

  .date {
    font-variant-numeric: tabular-nums;
    -webkit-font-feature-settings: "tnum" 1;
    -moz-font-feature-settings: "tnum" 1;
    font-feature-settings: "tnum" 1;
    font-size: 1.4rem;
    font-weight: 400;
    margin-top: 0.5rem;
    letter-spacing: 0.12em;
  }

  .spotifyRow {
    display: inline-flex;
    align-items: center;
    gap: 0.6rem;
    margin-top: 0.8rem;
    padding: 0.4rem 0.9rem;
    border-radius: 999px;
    background: #191414;
    border: 1px solid rgba(255, 255, 255, 0.08);
    box-shadow: 0 4px 12px rgba(0, 0, 0, 0.25), inset 0 1px 0 rgba(255, 255, 255, 0.05);
    cursor: pointer;
    transition: transform 0.2s cubic-bezier(0.4, 0, 0.2, 1),
      border-color 0.2s cubic-bezier(0.4, 0, 0.2, 1),
      box-shadow 0.2s cubic-bezier(0.4, 0, 0.2, 1);
  }

  .spotifyRow:hover {
    transform: translateY(-1px);
    border-color: rgba(30, 215, 96, 0.4);
    box-shadow: 0 6px 16px rgba(30, 215, 96, 0.15), 0 4px 12px rgba(0, 0, 0, 0.25);
  }

  .spotifyLogo {
    display: inline-flex;
    align-items: center;
    justify-content: center;
    color: #1DB954;
  }

  .track {
    max-width: 220px;
    font-size: 0.75rem;
    font-weight: 500;
    color: #e5e5e5;
    letter-spacing: 0.04em;
    white-space: nowrap;
    overflow: hidden;
    text-overflow: ellipsis;
    transition: color 0.2s ease;
  }

  .spotifyRow:hover .track {
    color: #ffffff;
  }

  .nextButton {
    width: 1.45rem;
    height: 1.45rem;
    display: inline-flex;
    align-items: center;
    justify-content: center;
    border-radius: 50%;
    background: rgba(255, 255, 255, 0.1);
    border: 1px solid rgba(255, 255, 255, 0.05);
    transition: all 0.2s ease;
  }

  .nextButton:hover {
    transform: scale(1.1);
    background: #1DB954;
    border-color: #1DB954;
    box-shadow: 0 0 8px rgba(29, 185, 84, 0.6);
  }
`;

export const updateState = (event, previousState) => {
  if (event.type === "UPDATE") return { ...previousState, ...event.data };
  return previousState;
};

export const render = ({ dateOutput, track }) => {
  if (!dateOutput) return null;

  const parts = dateOutput.trim().split(" ");
  if (parts.length !== 4) return null;

  const [date, day, time, seconds] = parts;

  const openSpotify = async () => {
    await run("osascript -e 'tell application \"Spotify\" to reopen' -e 'tell application \"Spotify\" to activate'");
  };

  const nextTrack = async (event) => {
    event.stopPropagation();
    await run("osascript -e 'tell application \"Spotify\" to next track'");
  };

  return (
    <div>
      <div className="time">
        {time}
        <span className="seconds">{seconds}</span>
      </div>
      <div className="date">
        {date} {day}
      </div>
      <div className="spotifyRow" onClick={openSpotify}>
        <span className="spotifyLogo">
          <svg width="14" height="14" viewBox="0 0 24 24" fill="currentColor">
            <path d="M12 2C6.477 2 2 6.477 2 12s4.477 10 10 10 10-4.477 10-10S17.523 2 12 2zm4.586 14.424c-.18.295-.565.387-.86.207-2.377-1.454-5.37-1.783-8.893-.982-.336.076-.67-.135-.746-.47-.077-.337.135-.67.47-.747 3.856-.882 7.15-.5 9.822 1.135.296.18.387.563.207.857zm1.225-2.72c-.227.367-.707.487-1.074.26-2.72-1.672-6.87-2.157-10.082-1.182-.413.125-.847-.107-.972-.52-.125-.413.107-.847.52-.972 3.676-1.115 8.243-.57 11.348 1.34.367.226.488.707.26 1.074zm.107-2.834C14.362 8.8 8.442 8.61 5.01 9.652c-.525.16-1.082-.14-1.24-.666-.16-.525.14-1.08.666-1.24 3.957-1.2 10.493-.986 14.61 1.46.473.28.627.893.346 1.367-.28.473-.89.627-1.367.346z" />
          </svg>
        </span>
        <div className="track">{track || "Spotifyを開く"}</div>
        <div className="nextButton" onClick={nextTrack}>
          <svg width="14" height="14" viewBox="0 0 24 24">
            <path d="M6 18l8.5-6L6 6v12zM16 6v12h2V6h-2z" fill="#ffffff" />
          </svg>
        </div>
      </div>
    </div>
  );
};clock_with_spotify.jsx
おわりに
本記事では2つのウィジェットを紹介しましたが,他にも色々とできることは多そうです。 アイデア次第で,機能やフォントサイズ,色合い,表示位置なども自由自在に変更できます。皆さんもぜひÜbersichtを活用して,自分だけのオシャレなデスクトップを作ってみてください!
Footnotes
-
壁紙画像出所:X (formerly Twitter)(2025). 「Perfume_Staff: 「「Perfume ZO/Z5 Anniversary “ネビュラロマンス” Episode TOKYO DOME」 “GAME” “再起動世界” 📸:Yosuke Kamiyama #ネビュラロマンス後篇 #prfm https://t.co/VPOqbWeCUc」 / X」 https://x.com/Perfume_Staff/status/1971167810337243447 (参照:2026年06月20日) ↩